Monday, December 27, 2021

Evening Light

In anticipation of a brand spanking new year, I've been tidying up my sewing space this week, including refolding and restacking my sample quilts.  I came across Evening Light and realized I never shared it on the blog!  It showed up in Instagram and Facebook, but not here.  There was even a draft post, but I never hit "publish".

So, here we go.  Presenting Evening Light!


I'm grateful for the man crouching under the quilt, pretending he's a post, allowing me to attempt to artfully drape the quilt beside the prairie grass.  My husband is always willing to hold up my quilts for photography, but impersonating a post is a new twist.  I think it worked pretty well :)

When I saw the digital swatches of Island  Batik's Celestials collection, I knew my astronomer husband  would love it.  I wanted a design that would let that lovely suns, stars and moons focal print shine.  


I was thrilled when Island Batik selected the design for their Spring/Summer 2021 catalog, along with Sailing School and Bright Seas.  I made the quilt, shipped it off to Island Batik for photography, then bided my time until the fabric shipped to shops before sharing the quilt with you.  There's always a rather long delay between sample making, then catalog publication, then fabric shipping to shops, and  it's been stretched even longer this year.  However, fabric is now in shops and I'm happy to be able to share.


I've been playing around with other color schemes for this design. While the design looks very traditional in the Celestials fabrics, one of the alternate color schemes makes it look very modern.  Fabric choice makes a huge difference.  

I'd like to share the alternate with you, but I'm having computer issues.  Apparently the hard drive to which I save my EQ designs is failing.  It's not even 2 years old yet, so I'm a little annoyed.  I do have backups, but I'm going to wait to get the replacement drive installed before I do anything with those backups!  I'm a bit worried about losing things.  I may have wiped out a drive back in my very first summer job, 30 years ago...

Anyway, stay tuned.  I'll share once I get the computer problems sorted out.


The Evening Light pattern is available as a PDF download in my shop, or ask your favourite quit shop to order print copies from major distributors.

Thursday, December 23, 2021

Revising the plan to get it done

Where did the year go?  Back in January, I finished up my Temperature Quilt 2020 top and made plans to piece a backing.  I planned to add a temperature/color key to the back.  If I paper-pieced one digit each week, I'd easily have the backing done to finish the quilt by the end of 2021.  I suspect you can guess where this is going.


There you go.  What you see above is all I got done on this project this year.  What can I say?  My priorities shifted.  I've had my most productive quilting year ever, and enjoyed every minute, but this quilt back was not part of that.

At this point, the whole project is sitting in a box on a shelf, sending me reproachful glances every time I grab a different box. It's interfering with my enjoyment of those other projects.  Every time I think I should be working on that backing but I don't feel like it, I lose my enthusiasm for the whole project.  That's just not right, because I was so excited about this quilt!

Temperature Quilt top 2020

So, I have decided to simplify my plan.  As my very wise daughter pointed out yesterday, it's my quilt.  I  can change the plan if I want to.  Plan changed!  I may or may not add a key to the label, but I'm definitely not piecing or appliqueing all those numbers.  I'll piece my color strips together to make a quick pretty back and get closer to a finished quilt I can toss on the couch and be happy with again.

I settled on this layout.


Let's see if I can get the backing pieced and the quilt basted by the new year.  I almost said finished, but honestly, I really don't want to set this quilt up for more disappointment!

I'd love to hear about any stalled projects you've had, and how you got them moving forward again.  

Friday, December 3, 2021

Half-Rectangle Units Tutorial

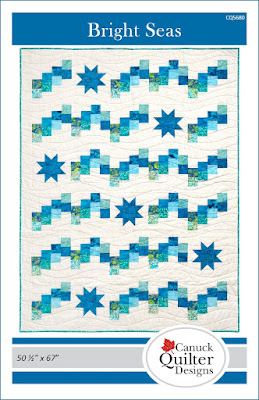
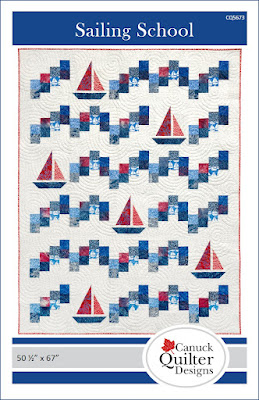
The sails in this block from my Sailing School pattern are made from HRT units

Here, as promised, is my tutorial about making half-rectangle triangle units (HRT) without specialty rulers. This method does involve a bit of fabric waste as the units are made a little over-sized, then trimmed down.  I think the little bit of trimming waste in exchange for ease and accuracy is worth it.

Traditionally, the HRT is twice as tall as it is wide, so those are the dimensions I worked with.

Here goes!

Step 1:  Determine the desired finished size of the unit. (Remember that the finished size is the size in the finished project, after the seam allowance is taken up by sewing the unit into the project.)


Step 2: You will need two rectangles of fabric. To determine the width of the cut rectangles:

    • For the cut width, add 1 1/4" to the desired finished width.
    • The cut height will be double the cut width.
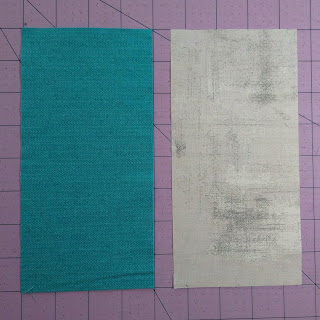
Step 2:  Cut two rectangles

 Step 3: Mark a diagonal line on one of the rectangles.  Careful!  The direction of the line matters.

    • For a left-leaning seam on the finished unit (from upper left corner to lower right corner), draw the line from the top right corner to the lower left corner.
    • For a right-leaning seam on the finished unit (lower left corner to upper right corner), draw the line from the top left corner to lower right corner.

Step 4:  (optional ) You will actually stitch 1/4" away from the marked line in Step 7. You may wish to draw additional lines now,  1/4" on each side of the diagonal,  to mark where to stitch.  If you have an accurate 1/4" presser foot as a guide you can skip this part.

Steps 3 and 4:  Mark one rectangle

Step 5: Place the marked rectangle on top of the second rectangle, right sides together.  So far this looks very much like the technique used to make HST.  However, if you now simply sew 1/4" on each side of the diagonal, you will end up with a kite shape rather than a rectangle shape.

Step 5: Layer rectangles right sides together

Not how you want it to turn out. Move on to step 6.


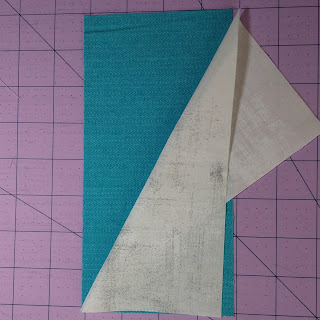
Step 6: Rotate the marked rectangle:

    • to the left (counterclockwise) for a left-leaning finished unit, so that the upper right corner shifts to touch the upper left of the bottom rectangle, and the lower left corner shifts to touch the lower right corner of the bottom rectangle.

    • to the right (clockwise) for a right leaning finished unit, so that the upper left corner shifts to touch the upper right of the bottom rectangle, and the lower right corner shifts to touch the lower left corner of the bottom rectangle.


Step 6: Rotate marked rectangle

To check that you have rotated in the correct direction, fold the top rectangle along the marked diagonal, and see if the result is approximately the HRT you plan to make.

Check orientation

Step 7: Sew 1/4" on either side of the marked line, then cut on the marked line.  

Step 7: Sew then cut into two units

Step 8: Press seams to one side or open, as you prefer. You now have two rough units ready for trimming perfectly to size.

Step 8:  Two untrimmed HRT units

Next, you'll need to trim these.  The tricky part is to position that diagonal seam correctly in the trimmed unit so that points don't disappear into the seam allowance when you sew this unit into your quilt.  The diagram below shows what happens when you place the seam corner to corner.  The seam, shown as a dashed line, cuts off points on the short ends of the unit.

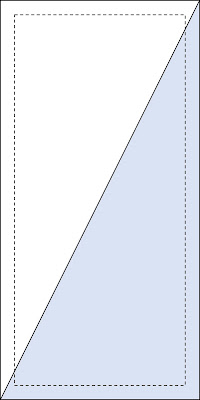
What you want to avoid


I've found that using a template to guide my trimming gives me the best results.


PREPARE A TRIMMING TEMPLATE

Step 9:  Draw a rectangle exactly the same size as your desired finished unit.  

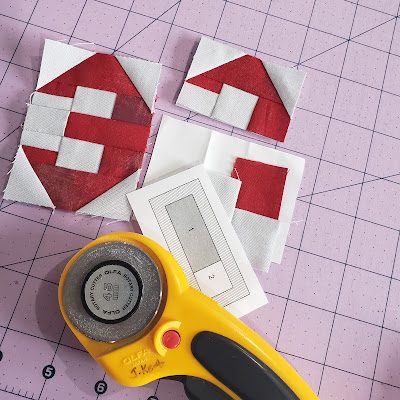
Step 10:  Using a rotary cutter and ruler, cut out the shape 1/4" outside the drawn shape all around.

Step 10: Cut out template

Step 11
:
  Draw a diagonal between two opposite corners of the drawn inside shape in the direction of the seam in your finished unit, extending the line all the way out to the edges of the cut shape.  Note that this diagonal does not intersect the corners of the cut shape.


Step 11:
 Tape the template on the underside of your quilting ruler, with the template flush with the corner of the ruler, and the drawn line visible through the ruler.


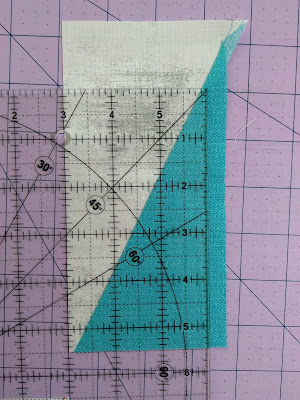
Step 12:  Position the template over the rough unit so that the drawn diagonal lines up with the seam in the unit.  
Step 12: Position the template


Step 13: Use a rotary cutter to trim the unit along the side and top edges of the ruler.

Step 13: Trim two edges

Step 14:  Rotate the unit.  Position the ruler so the markings for the required unfinished size line up with the trimmed edges.  

Step 14:  Position ruler to trim remining sides

Notice that the seam will not fall exactly in the corner of the ruler.

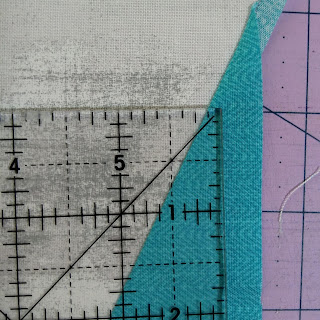
Seam will not go through corner of the ruler

Step 15:  Keeping the ruler in position, use a rotary cutter to trim the remaining sides of the unit.


The unit is now ready to use. The area outside the black outline in the image below is the seam allowance.  The area inside the black rectangle will be the finished unit as it will appear in your finished project, with the points in the corners where you want them.


I hope you have found this helpful.  Now go play with some half-rectangle triangle units!

***************

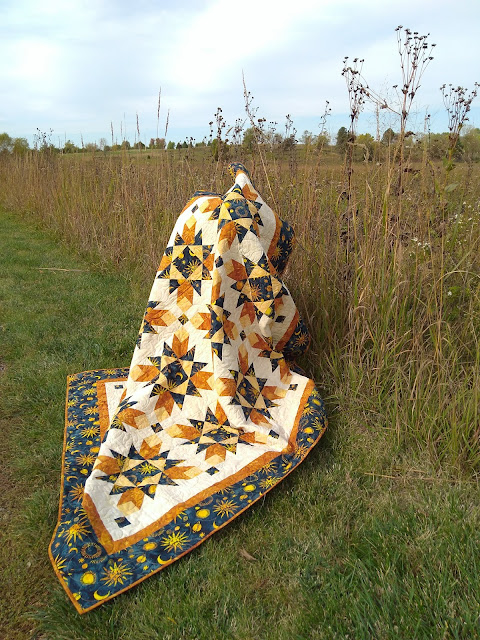
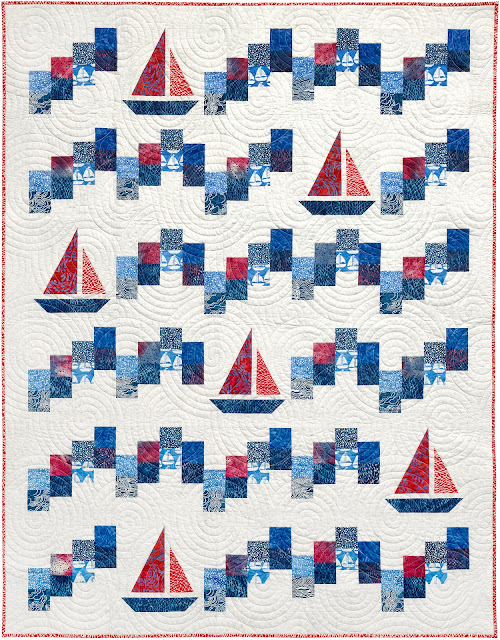
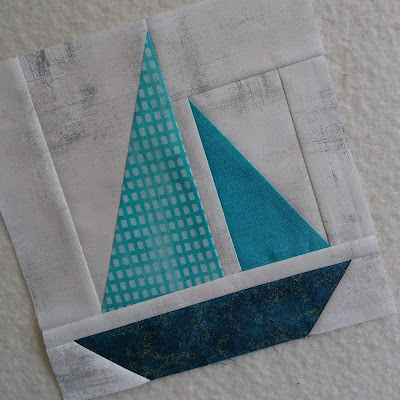
You can use HRT in many ways.  The sailboat block at the top of this post, and again below, is what made me sit down and figure out HRTs.


This version is 9" square.  If you'd like to make it but would prefer to skip all the math and drawing of templates, I've done the work for you in my Sailing School pattern.  See more of that quilt in this post.

You can purchase a PDF download of the pattern in my Etsy shop, or you can ask your favourite quilt shop to order a print copy for you.

Happy quilting!

Joanne


Friday, November 26, 2021

Just in case sailboats aren't your thing...

I really enjoyed making Sailing School and wanted to make more strip-pieced waves, but I didn't need two sailboat quilts.  I played with different block option to replace the boat, and of course I defaulted to stars.  There's just something about stars!  In this case, they bring to mind light sparkling on waves crests, so I named this quilt Bright Seas.


The star design may seem familiar.  I used it most recently in Stellar Stacks.  


I really like this particular star design for two reasons.  First, the proportions are a little bit different than those of a traditional sawtooth star block.  I like that they are a bit less square, yet not as complex as a Lemoyne star.  Second, the block construction is very forgiving.  There there are no seams crossing the points or valleys in the star, and while you can match seams to line up the points on the center, it won't be obvious if you're off a little bit.  There are also no triangles to cut and no bias edges to sew.


Aren't these fabrics beautiful? These batiks are from the Calm Lagoon collection, Sherry Shish of Powered by Quilting's newest signature collection from Island Batik.  As always, Island Batik fabrics were lovely to work with.  They're crisp to work with but drape beautifully in the finished quilt.  Starting on December 1st, Sherry is hosting a blog tour to highlight this collection.  I'm not participating this time, but I encourage you to go take a peek.  There will certainly be lovely eye candy.

As in Sailing School, these waves were strip-pieced, so they were quick to make.  The fabrics are distributed in the strips and two different blocks to appear well-distributed without having to shuffle pieces around on the design wall.  That also contributed to making this quilt a quick finish.


While my version is definitely beach and ocean themed, I think this design would lend itself to any color scheme.  At this time of year, my thoughts are turning to red, green, silver and gold.  I may need to go play with that idea.  There's always room for a new Christmas quilt, right?

I'll leave you with a question.  What's your favourite star block and why?


You can  pick up a PDF version of the Bright Seas pattern in my Etsy shop, or ask for a print version at your favourite quilt shop.


Friday, November 12, 2021

I miss the ocean - so I made a quilt

I spent my teens and early adulthood in Nova Scotia, never too far from the ocean.  There's nothing like the smell of the ocean and the sound of the waves breaking on the shore.  Since moving to Iowa, I have learned to appreciate a different kind of natural beauty, but I still miss the waves.  

The summer of 2020 was supposed to take me back to Nova Scotia for a visit. I had the plane reservations all set,  but we all know what happened with 2020!  The trip was cancelled, and I didn't get to see family or the shore.  Maybe that influenced my designing that fall.  I missed the sea and I missed family, and though I wasn't dwelling on that, my mind still created this:

Patchwork quilt.  Blue and red on a light background.  Sailboat blocks and squares arranged in a wave pattern.
Sailing School by Canuck Quilter Designs


I am so happy to finally share this finish, because it's one of my favourite recent quilts.  I had to wait a whole year to share this finish, until the Island Batik Sail Away collection I used was available in stores.  Island Batik sent me advance sampling to make the quilt for their Spring/Summer 2021 catalog.  I love that the collection has a range of blues, as well as prints in different scales to add visual interest.  that pop of red is great too!


Patchwork quilt made of blue and red fabrics on a light background. combination of sailboat blocks and squares  arranged in a wave pattern.

There's a bit of a wave in there, and did I mention my dad loves to sail?  (If you've been following this blog for  a while you might remember this quilt I made for him, also with a sailboat theme.) 

Those waves units are strip-pieced, so it didn't take very long to make this quilt.  I didn't even have to shuffle pieces around on the design wall in search of the perfect arrangement.  If you look closely, you'll see they are in a particular repeating order, listed in the pattern, but I think at first glance the pieces look pretty well distributed in a faux-random kind of way.


Closeup of a sailboat quilt block in a quilt, photographed  on a beach near the water.  Quilt features red and blue fabrics on a light background.
Closeup of Sailing School by Canuck Quilter Designs

I learned all about half rectangle triangles to design this sailboat block.  I wanted to be able to make it without paper piecing and without specialty tools.  In the end, I made them oversized, and added  templates to trim them properly.  (Spoiler alert: you can't trim with the diagonal running directly through the corners, or you'll end up wit cut off points.)  I do have a tutorial in the works.  It's much later than anticipated, as other priorities popped up, as they often do.  I promise it's coming, though!  It's about 3/4 ready, so how much longer could it possibly take?  Now I've jinxed it!


Sailing School by Canuck Quilter Designs. 
Photo by Jerry Khiev of Island Batik.

 I didn't have much time to make this before they needed to be at the Island Batik warehouse so they could take the photo above for the catalog.  I had two other quilts to make for them on the same deadline, so I didn't have time to quilt them myself.  Liz Meimann helped me out with a really quick turnaround time for longarm quilting. 

Did I just pique your curiosity about the other two quilts?  I'll share those soon!  

Happy quilting!

Joanne

Sailing School is listed in my Etsy shop as a PDF download.  If you prefer a print copy, ask your favourite quilt shop to order one for you.  I sell wholesale to shops through my website and through major distributors.

Monday, October 25, 2021

How do you feel about bias edges?  I've been playing with a new idea for placemats (yes, I'm still on a placemat kick!) and there are two ways to build them.  There's the slow way, one piece at a time, one after the other.  The second way is much faster, with strip piecing making it super quick.  

Echo Point Placemat - mocked up in Northcott's Bliss Basics

The catch is that the quick way involves bias edges, and I'm not sure how quilters in general feel about them.  These are not very long, they don't get handled very much to risk too much stretching, and there are ways to stabilize them.  I'm leaning towards the second method.  I really prefer fast when it comes to placemats!

Here's the runner to go with it.

Echo Point runner - mocked up in Northcott's Bliss Basics

I can think of a lot of variations.  This one uses two fabrics and a background, but I mocked up other versions with three or even four fabrics... It would also be easy to make longer or shorter, and the pattern could be easily written to make six placemats or a set of four placemats and the runner.  I see so many possibilities...

I plan to make a set for myself.  I already have fabric, though not the pretty Bliss pictured above.  What do you think?  Should I write the pattern?


Wednesday, September 29, 2021

Sneaky Sewing

Several weeks ago I went fabric shopping.  I had no Halloween décor for my home, so I enlisted my  friend and former coworker Amy, a huge Halloween fan, to help choose fabric for placemats to address that lack.

fabric:  orange, black with orange and cream Halloween text, cream with black spiders, black with tiny orange stars

Those spiders are a stretch for me.  Not a spider fan over here, despite knowing that they help control pests.  The color, scale and theme were right though, so I went with it.

Halloween patchwork using black, cream and orange prints
Halloween Fresh Wrapped placemats in progress

I chose to use my Fresh Wrapped pattern. There wasn't much cutting to do, as these are strip pieced, so the cutting and piecing were easily finished in one evening.  I then pondered what to quilt, and decided quilting in the ditch would be just fine.  The fabrics are the stars of the show in these, and since I was using Thermore for the batting,  I didn't need to quilt more densely than that.  Thermore is ideal for runners and placemats, as it has just enough loft to still show a bit of texture from quilting, but not so much loft that the surface is uneven and results in tipped beverage glasses. It also doesn't shrink, so paired with pre-washed fabric it results in a placemat that won't get too wonky after washing.

placemat sporting multiple binding clips, with a sewing machine
Binding Fresh Wrapped placemats

I think the binding took longer that the quilting.  Placemats are small, so it's easy to forget how much binding a table set needs.  This set has about 360".  That's 10 yards!  If you're wondering why I use so many clips, you can read all about it and the rest of my binding method here.  I've tried school glue instead of all those clips, but clearly I need to go back to kindergarten because I made a mess with the glue.  I'll stick with clips. 

Binding is rather boring, right up until it's finished.  When it's finished, I marvel at what difference the binding makes.


Fall flowers and mini pumpkins on a set of placemats and runner
Halloween version of Fresh Wrapped, by Canuck Quilter Designs

By now, I'm sure you're wondering why I titled this post "Sneaky Sewing".  Remember Amy, the Halloween fan?  Her local wedding reception was on Saturday, and this was her wedding gift.  Yup, I had her pick out her own gift without telling her that's what she was doing.  I sewed it in plain sight on Instagram and Facebook, too!

What is the sneakiest sewing you have ever done?

Saturday, September 18, 2021

Have you used a Jelly Roll lately?

 It's been a while since I used a jelly roll.  In fact, technically speaking, I'm not sure I have ever used an actual jelly roll, as that term is specific to Moda rolls of 2 1/2" precut strips.  I have, however, used other assorted packs of 2 1/2" strips.  I even have two strip-friendly patterns to revisit for National Sew a Jelly Roll Day today:  Sprinkled and Topiaries.

Quilt made of strips of bright colors, with inset accent triangles
Sprinkled, made by Theresa Peterson-Smith from the Canuck Quilter pattern

I just love this version of Sprinkled, made by my friend Theresa.  It's bright and happy and easy.  It keeps  the strips mostly intact and uses a simple cut-and-replace technique to add the sprinkling of triangles. The pattern uses 36 of the strips in a pack.  Some of those 36 strips are used for the little triangles in the border and for the binding.

My version used a strip pack of Shimmer from Northcott in a single colorway, for a more serene quilt.

Quilt made with assorted blue and aqua strips, with inset cream triangles
Sprinkled by Canuck Quilter Designs, using Northcott Shimmer strips


I recently played in EQ8 to recolor the quilt in Stonehenge Gradations fabrics.  The earth tones of the one below call to me as we head into fall, but the red and black below that one packs a punch and that's appealing too.

Precut-friendly strip quilt with inset triangle accents
Sprinkled by Canuck Quilter Designs, in Stonehenge Gradations Iron Ore


Quilt with black and grey precut strips with inset red accent triangles and a red border with inset triangles.
Sprinkled by Canuck Quilter Designs, in Stonehenge Gradations Graphite

My second pattern is Topiaries.

Quilt with blue border and octagons made of assorted blue precut strips, on a creamy gold background.
Topiaries by Canuck Quilter Designs

This one uses strip piecing and snowballed corners for quick assembly.  I want to make this again in florals, and in bright primary colors, and jewel tones...


So many options.  Unfortunately,  playing with these designs in EQ is about all I'm going to manage to mark Sew A Jelly Roll Day. I didn't plan ahead so I have no jelly rolls to use to sew along today, and I don't have any suitable yardage to reduce to 2 1/2" strips either.  My daughter borrowed the car to get to work, so heading out to the quilt shop is out.  

My only options are to (A) just enjoy browsing online to have a peek at what other jelly roll projects folks are working on today, or (B) forget the jelly rolls and go sew something else.

I'm going with what we call the Winnie the Pooh option*:  both!  What's under your needle today?


* For those who did not read and watch oodles of Winnie the Pooh as a child or with a child, Pooh Bear was offered "honey or butter on your bread" and replied "Both!"