Sunday, September 25, 2022

Refreshing the sewing room

What is it about fall?  It makes me want to move furniture around and get organized.  Maybe it's a throwback to back-to-school new beginnings. 

In any case, on a rainy Saturday a couple of weeks ago, I felt compelled to turn my work space into a disaster zone.  I wish I had taken pictures of the upheaval in progress, but I was too busy making a mess, then cleaning it up.  Here's the final result.

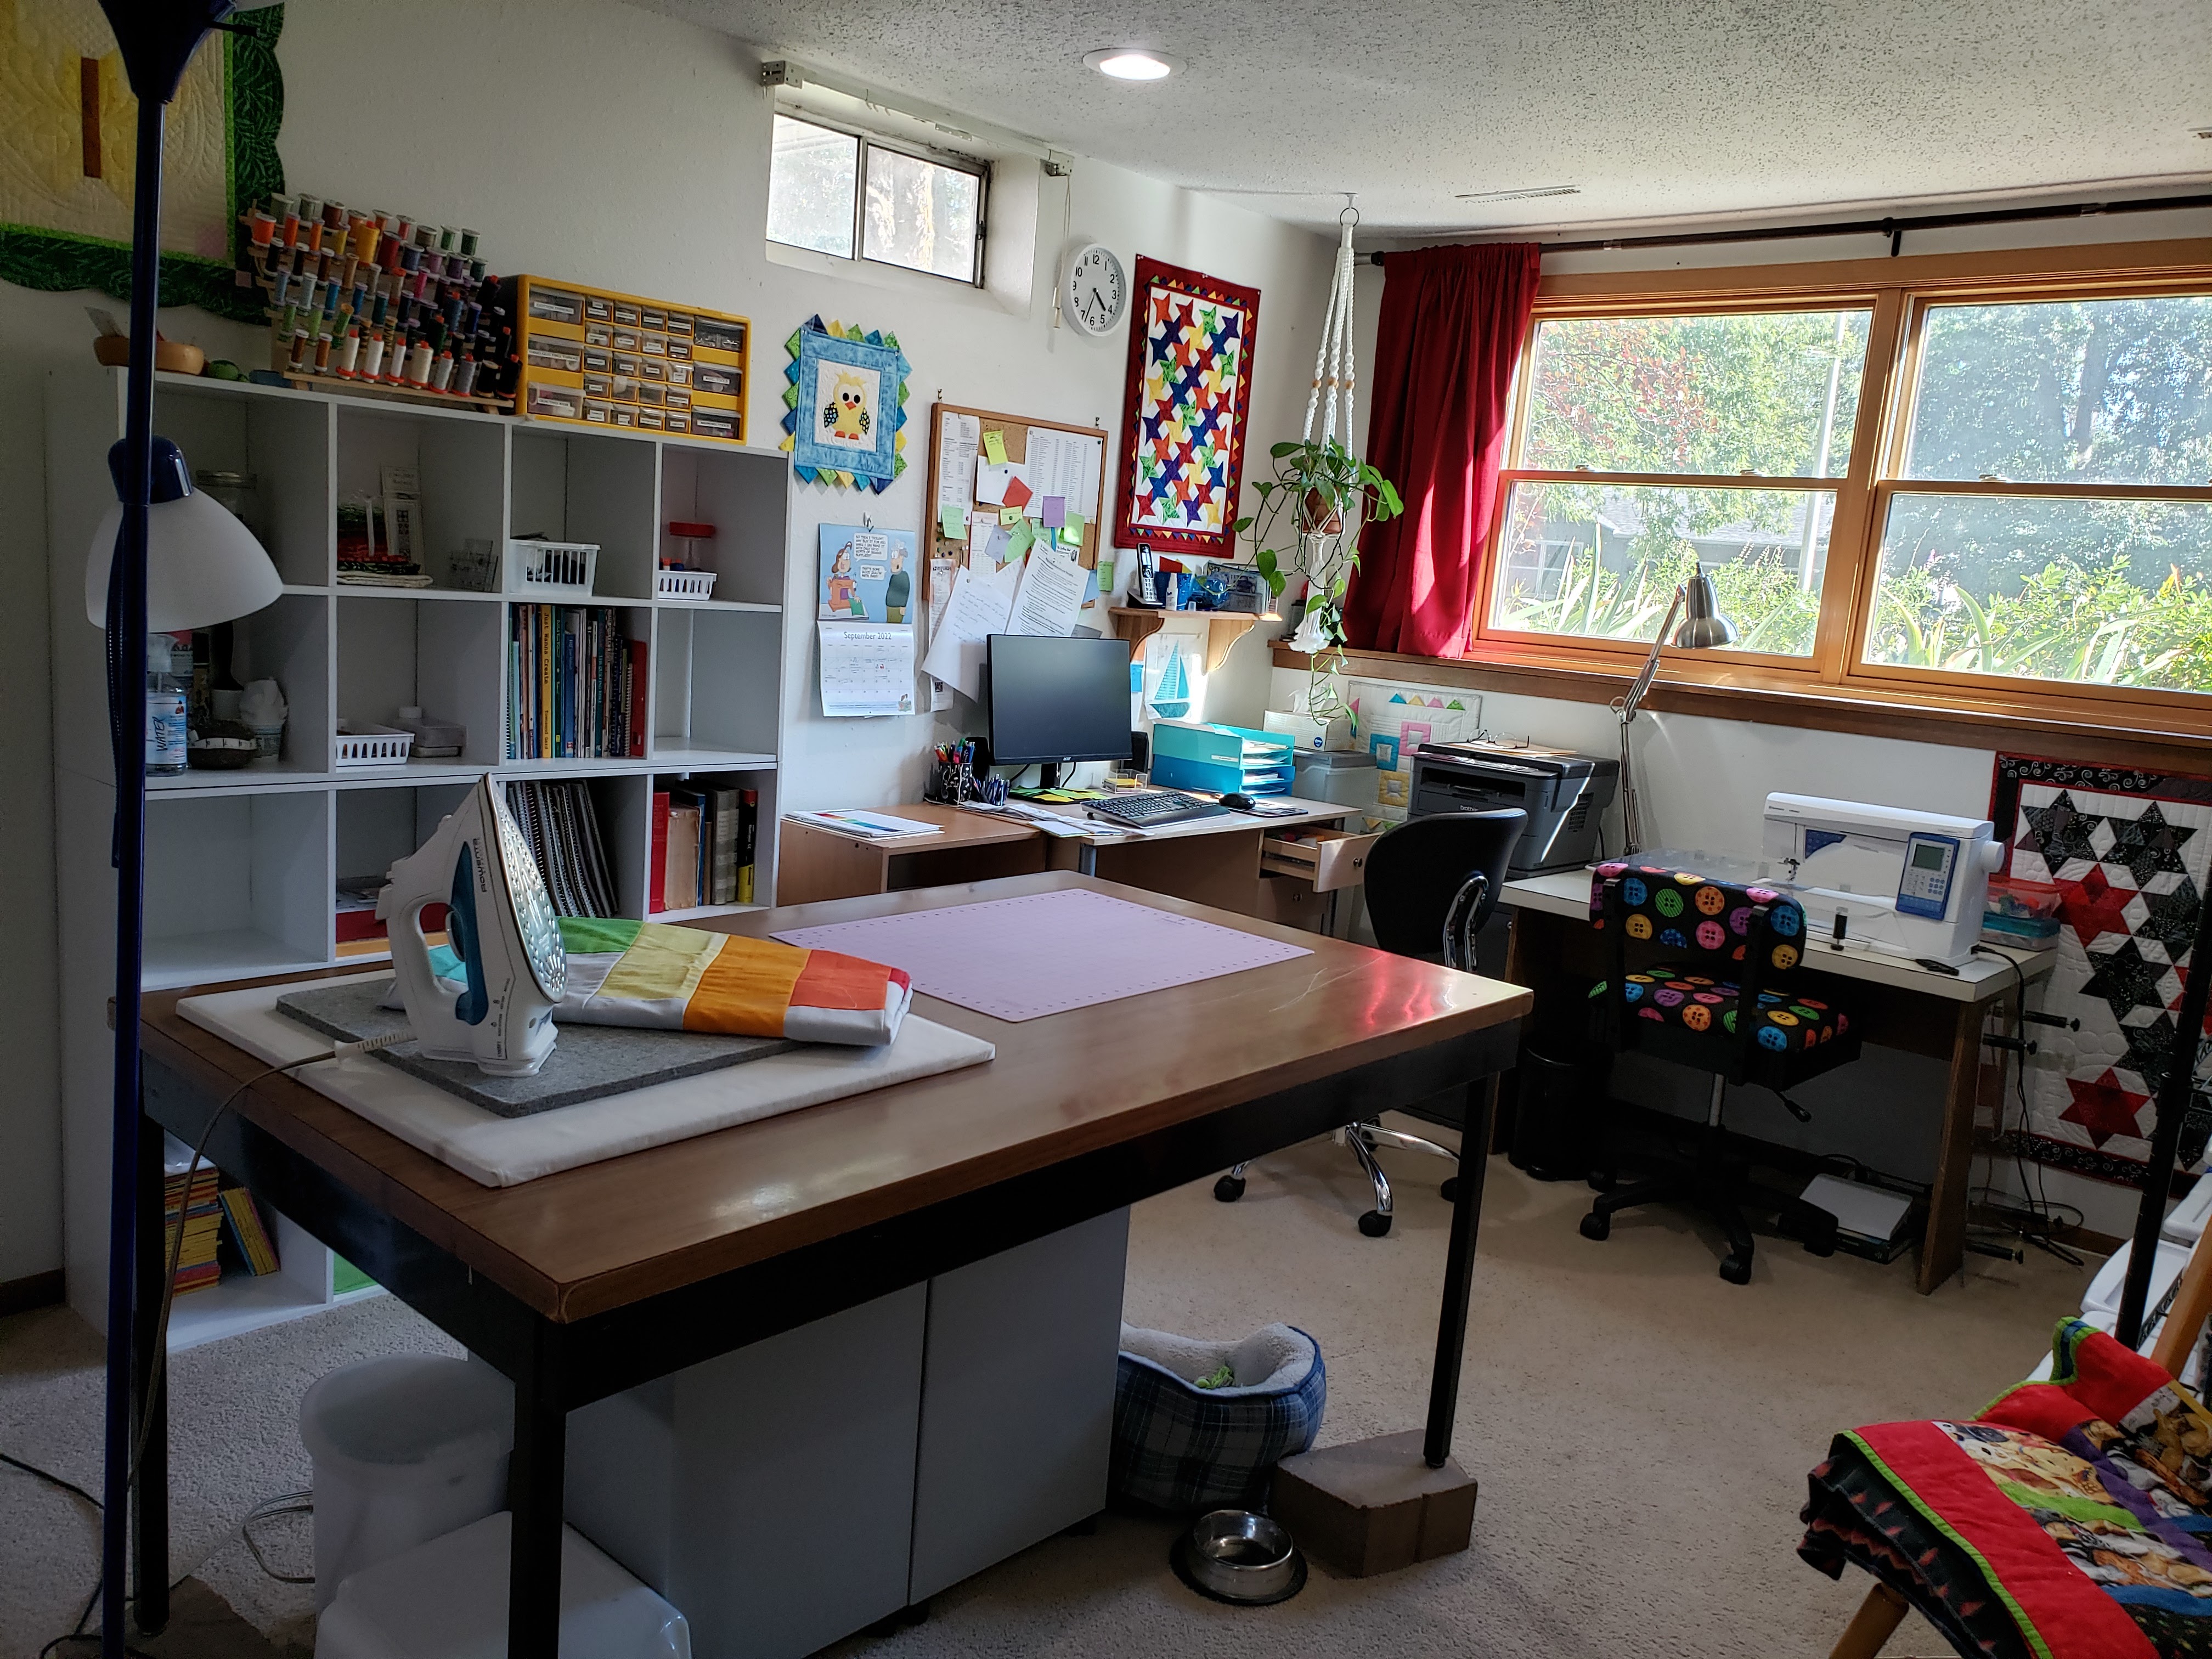
The cube shelving on the wall used to be at the end of the cutting table, cutting the room in half.  The wall where it now stands used to be the only blank wall I could use as a design wall, and there wasn't anywhere else to put the shelves.  

Disposing of a ratty old sofa last month opened up space for two shelving units, freeing up the wall you see on the right below to use as a design wall.  That wall space is a touch larger than the old design wall. I'll be excited to use it after I go to the quilt shop for batting to cover it.

Here's the other half of the room, also known as the pattern folding and shipping station when there isn't a quilt on the table.  

The two shelving units that I moved to make room for the design wall ended up here where the sofa used to sit.  There was room to spare on the wall to stack the plastic drawers that had previously lived on the shelves.  That opened up shelf space so I don't need to figure out where to put an extra unit.  I thought I would need one, and the only place I could think of to put it was up against my cutting table, cutting the room in half again.  The blank wall you see behind the table isn't actually free space.  I need to keep it open because it's the only place I can pin up a quilt and control lighting to take a half-decent flat quilt photo.

I'm really pleased I didn't have to cut the room in half with extra shelving.  See how spacious the room feels now?

I love how open the space feels.  Despite initial misgivings about the whole moving-things-around business, Rosie also approves.  She can settle into her cave under the printer and not have to move to keep me in sight when I need to work in the back half of the room.


Just so you know, she has a couple of comfy dog beds down here, but this is where she likes to hang out!

Moving stuff around brought a few neglected projects back into the light, and my refreshed workspace has renewed my enthusiasm.  I'll take the motivation while it's here and go finish something.  What about you?  Does your workspace help or hinder your creativity and motivation?

Happy quilting,

Joanne

Wednesday, September 21, 2022

Starlit Picnic Finish!

Just a quick post to share the finished quilt. After sharing so many progress posts about Starlit Picnic, (see my earlier posts here, here and here) I almost forgot to show you the finished quilt.  While I shared on Facebook and Instagram quickly from my phone, I needed to be at my computer to write a blog post.  I may have become distracted by new designs when I sat down at the computer...but that's another post.

Here it is: Starlit Picnic!

As you can see, after much deliberation, I chose a scrappy bright green binding.  Well, after much deliberation, there really wasn't much choice after all, as it turned out my stash couldn't cough up enough of the blue to match the binding to the border.  The bin of bright green scraps was more obliging.  You might be able to make out the different prints in the binding in the photo below.


One more picture because this quilt just makes me happy.


Now I'm inspired to finish up a few more UFOs...as soon as I decide which one inspires me most at the moment. Does a finish inspire you to move on to something else right away, or do you take a break before the next project?

Happy quilting,
Joanne

Get the Starlit Picnic pattern as a PDF download in my Etsy shop, or ask for a print copy at your favourite quilt shop.  Shops, please visit my website for wholesale information or find my patterns at distributors Checker, Brewer or E.E. Schenck . 

Sunday, September 18, 2022

Party Crackers reveal

The Baroque collection from Island Batik is shipping to stores this month, so I can finally share two projects I've had under wraps since early this year.

First up is Party Crackers.


I just love this one. It's been hard to keep it to myself for months.  First, this landed on my front step, courtesy of Island Batik, and I had to ooh and ahh in private.  I particularly love the 1st, 2nd and 4th fabrics in the photo below.  The photo doesn't do the lightest fabric justice. It has really pretty blue and purple accents washing through it.

Since I couldn't share anyway,  I didn't take many process pictures.  I have no pictures of all the stitch-and-flip sewing and trimming, or chain stitching, or blocks.  We magically jump from yardage to quilt!  Look at those gorgeous colours!


All the angles and points in this quilt are made with stitch-and-flip corners, so despite all the angles, you only need to cut squares and rectangles from the fabrics.  

The stars in the center of each block are my favourite floating stars. Because they're designed to avoid any risk of cut-off points, they're the most stress-free star block I have made.


I'm limited to outside photos on my deck at the moment.  While in the past I used to roam the yard and take pictures over various fences and posts with flowerbeds in the background and foreground, I'm afraid that's not working this year.  First, it's been very dry and things are looking a little brown and stressed.  Worse, the yard has been invaded by chiggers.  Nasty little microscopic bugs, leaving super nasty itchy welts where they have crawled under clothing.  I'll leave it to your imagination.  I'm just not enjoying my yard this year.  Good thing I still have the quilting room when I need a retreat!

How did your yard fare this summer? Did you escape to the great outdoors, or escape from the great outdoors to your quilting room?

Happy quilting,

Joanne

Get your copy of the Party Crackers pattern as a PDF download in my Etsy shop, or ask for a printed copy at your favourite quilt shop.  Shops, please see my wholesale page for wholesale information or find the pattern at distributors CheckerEE Schenck or Brewer

Monday, September 12, 2022

Progress on the 2020 Temperature Quilt backing

As I wrote in this post last December, I gave up on paper piecing numbers for the color key on the back of my 2020 Temperature Quilt.  I didn't care enough about this backing to spend quite so much time on it.  I decided to just use the colours, and skip adding any extra information to the back.

2020 Temperature Quilt

Having made the decision to skip the numbers so I could move the project forward more quickly, you might think I would have a finished quilt to show.  The fact that I don't is a pretty clear sign that I wasn't happy to leave numbers out after all.  I just had to figure out a different way to add them. 

It's been nine months, but inspiration finally struck.  I don't have an embroidery machine, and no inclination to hand embroider, but I can freemotion quilt the numbers.

I have quilted letters into a quilt top in the past.  As I did then, I printed the numbers in a very large font (I think these were about size 250) to make a template.  You can see I printed out a few different fonts to audition them.  I'm afraid I forgot to note what fonts these were and I didn't save the file.  Oops!

This time, I chose to cut out the numbers and trace around them onto the fabric instead of stitching through the paper template and tearing it away afterwards.  I used a SewLine mechanical pencil with a ceramic lead.  It's erasable and water soluble so if my FMQ stitching doesn't quite cover the lines (I can pretty much guarantee it won't) I can erase what shows.

My challenge here was that I needed these on the back of the quilt, but quilting through all the layers would result in backward numbers in random places on the front.  My solution was to quilt these onto the backing before layering the quilt. I had scraps of thin Thermore batting, so I cut small pieces of that to place behind the numbers, then stitched through the backing and batting, outlining the traced numbers.

You can see I didn't manage to stitch perfectly on the traced lines, but who will know once I erase the markings?  I also see a bit of thread build-up in places where I started and stopped, but I can live with that in this quilt quilt.  I just want it finished!

The Thermore batting is fairly thin, so I'm counting on it not causing extra puffing in assorted spots in the quilt when I sandwich and quilt the whole quilt.  I'll let you know how it turns out.

I have a few more numbers to quilt before I get to the sandwiching part, but it shouldn't take long. I really thought I'd finish the numbers last night, but when a thread nest developed halfway through, I took it as a sign it was time for bed.

I think I'll have time to finish these numbers tomorrow.  Hopefully, the sandwiching and quilting after that won't take vey long.  Do I dare announce an expected reveal date, or would that be a jinx?

Happy quilting,

Joanne

Friday, September 9, 2022

Is this early or late?

Is it too early to share a Christmas project? 

Actually, this share is really late, as I pieced this quilt in October 2021.  I spent some time yesterday sorting through photos on my phone, and found quite a few things I have neglected to share.  Festive Lanterns was one.

This project began with the Winter Wonders collection from Island Batik.  


It involved a fair bit of stitch-and-flip sewing and the resulting corner trimming.


According to the next photo, found among the rest, it seems I needed to do a little seam ripping along the way.  I dimly recall sewing a square to the wrong corner of the block.  I started sewing on automatic pilot and wasn't paying enough attention.  I'm glad I wasn't quite on automatic when I was trimming, so I caught my mistake before I trimmed.


From cutting fabric to finishing the top only took five days.


Christmas blew past before this got quilted.  In March I finally admitted I didn't have time to quilt it myself and sent it out to Liz Meimann with a few others so I would have a finished quilt to share around the time this fabric shipped to stores.

Right.  Well, I fell down on the job with that.  I had a quilt to share but I forgot to share it.  I'm a couple of months late.  I think it was being shipped and promoted in July or August.

Getting a decent photo inside over the winter and early spring was a challenge.  Here's my attempt at "artful drape".


It does show off some of the prints nicely.  The pattern, I Spy Lanterns, was designed to showcase medium to large size prints.

In mid-summer I headed out to my deck for a second photo shoot.


I have made two other very different versions of I Spy Lanterns, and I planned to share links to those other version, but I can't fins any links.  It looks like I didn't share those either!  Here you go, just a quick look:


I really need to quilt the last version.  It's too pretty to stay a top forever.

I'm off to sort through more photos.  Camera phones and cheap memory results in a ridiculous number of pictures! I suspect I'll find a few more things I didn't get around to sharing earlier.  Stay tuned!

Happy quilting,
Joanne


The I Spy Lanterns pattern is available as a PDF download in my Etsy shop, or you can ask for a printed copy at your favourite quilt shop.  Shops, please see my wholesale page for wholesale information or find the pattern at distributors Checker or EE Schenck.

Friday, September 2, 2022

Quilting the border

Starlit Picnic is almost ready for a photo shoot.  I just finished quilting the border and just need to choose a binding.


Though I had planned to continue grid quilting in the borders, I hesitated.  That was a clue that perhaps it wasn't the right choice.  After much pondering, I decided more grid quilting might be a bit too heavy. 

 I considered some ruler work, but my machine isn't liking that right now, skipping stitches when I quilt in a few different directions.  Hopefully a visit to the sewing machine spa will take care of that problem, but I couldn't wait that long to finish this quilt.

When I looked though Melissa Marginet's book Walking Foot Quilting Designs for inspiration, a square cable design caught my eye.  It till seemed too grid-like, but it did get me thinking about cables.  I looked through my small collection of rarely used quilting stencils and I actually had one that would fit the space.  I also like that the points in the cable tie in to the points in the stars.


I had to add some straight line frames to fill in the width of he border.  Repeating the spacing from the sashing quilting did the trick and also tied the border quilting to the rest of the quilting.  Just like I planned it!

Figuring out how to adjust the pattern repeat as I traced the stencil almost brought this plan to a halt, but walking away, having a good meal, and coming back to it worked wonders.  When I got back to it, I found my math was right after all and I got the cables to go around the corner properly and everything.  I'm still not sure what I was doing wrong on my first try.

I quilted this cable with my walking foot, in four passes around the quilt.  I'm so pleased with how it looks!

Now, should I bind in the same blue as the border, or with a bright green scrappy binding?  I had planned the green, but I wonder if that will look good with the cable.  I suppose Step 1 is to check if I have enough of the blue.  I might have to go with bright green by default.