Monday, November 5, 2018

Starlight Wishes revisited

Last fall I whipped up a Starlight Wishes quilt top in alternate colors and in a larger size, fully intending to rewrite the pattern to include extra sizes. I didn't get much farther than the flimsy because I couldn't decide how to quilt it. Other projects, deadlines, and life got in the way.

This summer, after learning to use my Westalee quilting rulers, I quilted it.  I already shared photos of the baptist fan quilting.  It was just what this quilt wanted. If I had to do it over again I would probably tweak the border quilting a bit, but I'm not picking it out!  This quilt is officially a finished quilt!


Starlight Wishes all grown up

Here a full view.


I debated leaving off the blue border and making the cream one under the prairie points a little bit wider.  I liked it that way too.  It had a bit more modern feel to it that way.  However, I was feeling less modern on the day I decided I had to make up my mind one way or the other!

My initial reason for making this version was to show the quilt in a non-baby colorway for the cover of the revised pattern.  Didn't it grow up nicely?  But with this on the cover, how will people visualize it as a baby quilt? The answer was to add an inset photo of the brighter baby quilt, but I don't own that quilt anymore to take a proper flat picture for that purpose.

I had no choice!  I just had to make another.

Starlight Wishes, half-scale version

I'm sure you noticed this isn't quite big enough for  a baby quilt.  I'm running out of room to store quilt samples and I figured in a flat shot with no size reference, it wouldn't really matter that the quilt was not full-scale, but it would still show off an alternate colorway.  I made all the parts half-size. It is awfully cute!  Those tiny little prairie points were not difficult to make but they are too cute for words. I'm pretty sure this quilt will claim some of my sewing room wall for "storage" space.

So there's the cover for the revised version all planned out and squared away.  Now all I have to do is actually revise the pattern...which turned out to not be as straightforward as I expected.  May I bend your ear and solicit some opinions, please and thank you?

The original quilt called for cutting rectangles and pairing them up to make square units.  Making strip sets and sub-cutting units would also work, but was very wasteful of fabric for the baby size, with lots of leftover lengths of strip sets.  It wasn't a big deal to cut individual pieces for the baby size because there weren't that many pieces (relatively speaking).  When I started working out cutting instructions for the twin and queen sizes, the number of rectangles got very large. That makes strip piecing and sub-cutting much more attractive.


Including both option, or strip piecing for some sizes and not for the other makes a very clunky, unwieldy pattern, and alternate fabric requirements, so I need to choose just one method.  Strip piecing makes for lots of leftover strip set chunks in the smaller sizes.  Not strip piecing requires a lot of extra cutting in the larger sizes.  Which would you prefer to see in a pattern?

I will put off that decision till  have more data (that would be your input) and indulge in a little bit of sewing for the rest of the day.  Happy thought!


Saturday, October 13, 2018

Is this Magnitudes?

Do you ever take a pattern and not only choose different fabrics than what the designer used but also completely re-imagine contrast and blending?  An alternate version of Magnitudes has been bouncing around in my head for several months and I finally caved and set everything else aside.

Milky Way from pattern Magnitudes by Canuck Quilter Designs
Milky Way from Magnitudes pattern by Canuck Quilter Designs 2018

I really love blue and white quilts.  I can't believe I haven't made one since Clear Skies in 2013. It was time!

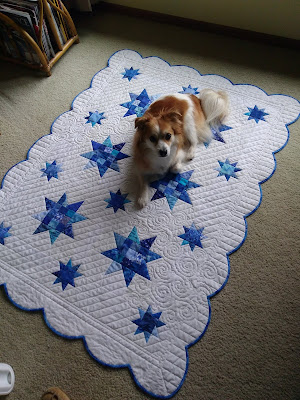
Milky Way from Magnitudes pattern by  Canuck Quilter Designs 2018.

I named this one Milky Way, but it is made from the Magnitudes pattern. In Magnitudes the stars are a solid color on a scrappy colour background, but I flipped that around here.  The stars are the pop of colour instead.  By matching the block background to the sashing and borders, I made all the stars float. 


This quilt top was made entirely from contents of my scrap bins.  In addition to cutting instructions that tell you how many strips to cut and sub-cut when you are using yardage, the pattern includes a table that summarizes size and number for each piece in the quilt. You can dip into your scraps, even odd shaped and small pieces, and just keep digging and cutting until you have the right number of pieces. Even the white background is made up of various white-on-white print scraps.  I think it adds interest to all that white background space. This photo of the quilt in progress shows that best.

Scrappy white-on-white background

Quilting the quilt was a bit of an adventure. My original plan was to freemotion loose hooked swirls all over the background.  Stop.  Nothing else.  It was supposed to be quick and easy, but by the time I had quilted half the swirls that are in the finished quilt, I knew I was having trouble with loose and open.  My swirls were tight and dense and I thought they looked too busy to cover the whole background.  I went to bed, slept , and came back with a different plan.  I extended the swirls across the rest of the width, like a path, and switched to my trusty walking foot to do all the straight line quilting.  I was tempted to add some freemotion ruler work circles in the border, but decided that would be too fussy and distract from the swirls and the planned scallops.  I settled for using the rulers to make quicker work of the piano key quilting.


This is the baby size, but I doubled the width of the border to give me enough width to cut a scalloped edge.  A coworker told me I was a glutton for punishment when I told her I planned to scallop the borders, but in the end it was not as frightening as I feared.  I admit I took several deep breaths before I wielded the scissors on a perfectly good, almost finished quilted quilt!

Scalloping a quilt border
No turning back! Scalloping the edge.
I used Darlene Zimmerman's excellent instructions from her book The Quilter's Edge. I think the key was her tip to draw the scallop, sew on the drawn line, and not cut along the scallop until after the binding is sewn to the front of the quilt.  Also, use single fold bias binding.  The bias helps when going around the curves and the single fold minimizes bulk in the Vs between scallops.

Before I sign off I have to share the back!  I swear I wasn't thinking about the scallops at all when I pieced the back.  I had orphan blocks from two or three years ago that were the right colour and size to add the needed extra width to my length of backing fabric. Aren't they a perfect fit?

Orphan blocks on the back of Milky Way

May I say I love, love, love this finish?

Linking up with 
DrEAMi at mmm!Quilts 

Friday, October 12, 2018

Magnitudes Parade of Quilts

As promised (though very late and with apologies to my testers), I am sharing pictures of my pattern testers' versions of Magnitudes.  As always, the variations astound and delight me!

Elaine and Joanne's quilts both conjure visions of fall.  Perhaps the summer heat had them both thinking of cooler weather!


Magnitudes pieced by Elaine Williamson, Ontario, Canada
You can find more of Elaine's beautiful work on her Flickr feed.

Magnitudes pieced by Joanne Harris
Joanne is a prolific quilter.  Sh shares her work on instagram as @turltlequilterjo and on her blog.

Magnitudes pieced by Sue.
I'm thrilled Sue chose to use her hand dyed fabrics to make her quilt. As you see, she even used up her scraps to add a piano key border.  I love to see quilters add their personal touches to my designs.

Magnitudes pieced by Kathi Kivi
Kathi added extra sparkle by fussy cutting stars for the centers of the large stars in her sweet baby version.  See more of Kathi's work on her Facebook page.

Thank you again testers!

Next up is my latest version of the quilt.  I flipped the fabrics and tried something new with the binding.  You won't want to miss it!