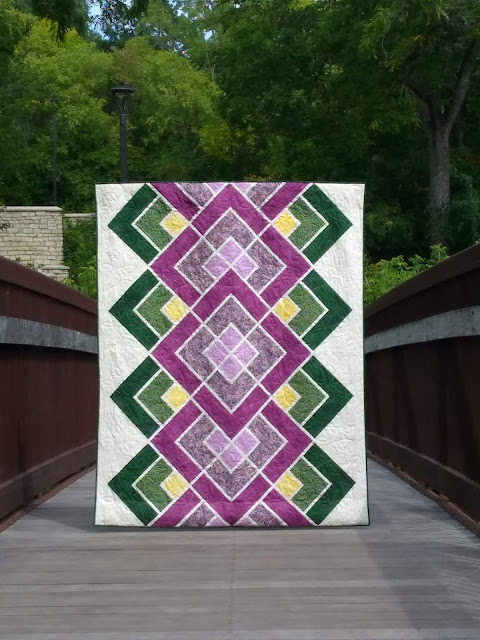
Getting good photographs is rather important to market my patterns, so I have some incentive to work on my quilt photography skills. With seven patterns to usher out into the world this week, I got some practice in over the last couple of weeks. Despite buying studio lights and a tripod to use indoors, I struggle with taking good, evenly lit photos with accurate color, so I headed outside.
 |
| Polarized by Canuck Quilter Designs |
This was one of my successes last week. Can you believe how well the blue sky and water and that touch of greenery on the far shore match the quilt? I took a small detour on my way to dropping my husband off at work and pressed him into service as quilt holder. He was a good sport. I'm sure his arms were tired by the time I got this shot, because a slight breeze was blowing and we had to wait for the quilt to drop flat between little gusts, and of course exactly as I pressed the shutter there came the breeze again.
This was actually Day 2 of the quilt photo shoot. The day before we went out to a different park with an armful of quilts, planning to try flat shots for the covers, and styled shots because they're pretty. I knew it was hot outside, but I didn't realize just how hot until I was walking through the park with a stack of quilts, with sweat stinging my eyes. My enthusiasm took a nosedive, but my husband convinced me to try at least one flat shot of each quilt, because the pattern release deadline was looming and I had no pattern covers.
This is the best we managed for Polarized. It looks pretty dingy and yellow, and my limited Photoshop skills could not rescue it. I was so miserable while taking this miserable photo. Thank goodness for a good night's sleep, slightly cooler temperatures and an accommodating quilt holder. The next morning I got a great picture in less than 10 minutes without risking heat exhaustion.
We did have some success with other quilts on Day 1, after coming to grips with the idea of stepping out of the cooler shade.
 |
| Glacial by Canuck Quilter Designs |
 |
| Modern Lace by Canuck Quilter Designs |
 |
| Stellar Stacks by Canuck Quilter Designs |
Here's a peek at how I made the quilts hang mostly straight.
 |
| Pieced back of Polarized |
I pinned hanging sleeves to the back of the quilt on both the top and bottom, and inserted a rod in each. The top rod keeps the top edge of the quilt straight, and gives the quilt holder something other than the corners of the quilt to grip. The bottom rod weighs down the quilt so it doesn't ripple and sway and flap around as much, and keeps that edge straight as well. You could use any straight rod or dowel, but I bought two adjustable Hang-It Dang-It rods to use so I can easily adjust the length to fit whichever quilt I'm photographing.
The other important part of these photos is aiming the camera at the exact center of the quilt, and keeping the camera perfectly level. If the camera is angled at all, there will be a "keystone" effect, where the quilt will appear narrower at one end than the other. I'm getting pretty good at shooting straight, but I admit to using some editing software to square up the photo if it looks crooked on the pattern cover.
I used the sleeves and rods for this updated photo of Ripples Cubed as well.
You can see the quilt hangs much better than in my original "hold it by the corners" picture:
Besides the flat shots for the pattern cover, which are not optional, I like to have a few prettily styled, photos as well. I didn't attempt those until the outside temperature was less oppressive, and I haven't finished sorting through them yet. I'll share some of those photos soon.
In the meantime, I'd love to hear about your own quilt photography challenges and successes, and any tips and tricks.
Patterns for the quilts above are now available as PDF downloads in my Etsy shop, or ask your favourite quilt shop to order print copies.


You have quite a talent for quilt photography ! I had no idea it took so much time, effort and skill to get a quilt to cooperate for a photo. Kudos to you for doing your own work all the way through from design of the quilt to the design of the cover.
ReplyDeleteThe photos you took look great! Beautiful quilt designs! I like you dread the photo shoots.
ReplyDeleteYour quilts are so gorgeous! Congrats on upcoming releases:)
ReplyDeleteVery smart tools for getting well hanging quilts in your photos. You know a whole lot more about this than I do!! :)
ReplyDeleteI love the way you keep them "straight". I, too, have a love hate relationship with it, and am always trying to keep the "holder" out of the shot. We did may something similar, but I should have just used those rods!!
ReplyDeleteThe hang-it dang-it looks pretty cool. I agree with you on the photographing challenges. I put my camera on continuous shoot on a breezy day, to hopefully catch when the quilt settles for two seconds. I have bought a bunch of clips-on-rings (for hanging curtains) that I've been using to hang my quilts, and have debated about hanging a pole off the bottom, too, to help weigh it down. That's good for shots that I crop close to the quilt, but isn't so good for the artistic shots. Your quilts are beautiful, and the photos of them are awesome.
ReplyDeleteThose shots are great! Good tips - I am terrible at taking photo's of quilts.
ReplyDelete