There's nothing like a deadline to make me finish a quilt. To be clear, I enjoy finishing quilts. It's just that I can sit and stare at a quilt top for a very long time before committing to how to quilt it, so the finish is often delayed.
 |
| Rosie telling me a quilted quilt would be more comfortable than a mere quilt top |
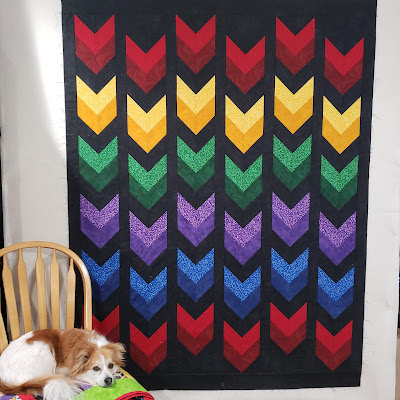
My new pattern, Rush, needed a cover quilt to be ready for sale when a certain fabric company's catalog goes live. I had to stop waffling and quilt it already! I listened to Rosie and got to work. Here it is, quilted and bound :)
 |
| Rush by Canuck Quilter Designs |
When I first started playing with a chevron shape in EQ8, I built it with flying geese units. That would have worked fine, but would have a lot of points that could be potentially cut off, and I wasn't feeling like taking on that challenge just then, so I let the design sit.
When I was working on the last set of Echo Point placemats, I had an flash of inspiration. Echo point is essentially a chevron. Why couldn't I build the chevrons in the quilt the same way? I had to work out some math to figure out sizes and make sure I wouldn't end up having to cut non-standard measurements but everything fell into place.
Construction went very quickly after that, except for the pause for a sulk when I sewed the sashing to the wrong side of a couple of rows.
 |
| Sashing in the wrong places |
Once I got over my sulk, ripped some seams and sewed it all back together properly, Rosie supervised border measuring.
 |
| Rosie in supervisor mode as I measure a border strip |
I like to lay the border strip directly on the quilt and just mark the length right on the strip. I lay it across the middle, then the top and again at the bottom to make sure there isn't any huge variation, but usually the measurements are close enough (less than 1/4" variation) that I can just use that middle measurement. I then layer the strip over a second border strip, matching one end, and cut both strips at once to the marked length so that I know the borders will be exactly the same length.
 |
| Completed Rush quit top |
This was my design wall for a while. The quilt looked pretty up there for at least a month while I worked on smaller things that didn't need the design wall and I pondered whether I was going to quilt this myself or send it out for quilting.
It would have been faster to send it out, but I was really stuck on thread colour. I didn't want a lighter colour thread showing up across the black background, but I didn't want black thread over the colours either. A medium colour would have been a compromise, not perfect on any of the fabrics. I wasn't up for paying for custom quilting to switch thread in the different areas. OK then, home quilting was the way to go.
 |
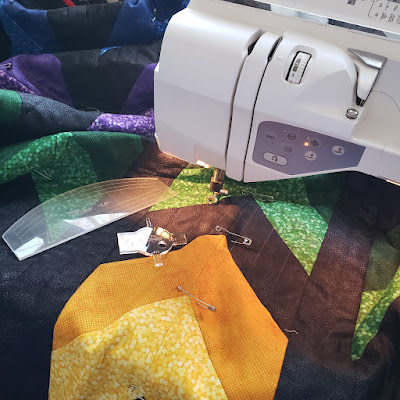
| Quilting on my domestic sewing machine |
I could work around this machine issue if I reverted to straight lines. Here's the first bit I quilted.
I rather liked the squares, but I was running out of time so I simplified things in the rest of the colours.
This worked just as well, I think. It's less fancy but equally effective at creating texture and highlighting the chevron's shape.
I was limited in my thread colour options, as I didn't have access to the quilt shop (we're a one car family and I didn't have time to taxi husband and daughter to work to keep the car myself). I was surprised I actually had just the right thread colours for most of the chevrons, but red was trickier.
At first glance, I though the one on the right would be the best bet. Just to be sure, I pulled some thread off the spools to audition them that way.
Huh. Look at that. I'm partial to thread that blends with the fabric, so I see texture rather than a line of colour where the quilting is. In that respect, the thread on the left, which absolutely did not look like a good match on the spool, looked like a better choice.
As I stitched I wasn't sure, but now that it's all done, I'm happy enough with my thread choice.
Finish everything off with a bright red binding, mount it on the wall, take a picture, call on my very limited photoshop skills to straighten the picture a bit, and voila, a pattern cover!
Rush is a throw size quilt, though you could easily add more chevrons to enlarge it.
How do you feel about sewing with 45 degree shapes like the ones I used in Rush? I'm working on a tutorial about cutting and sewing these shapes. They are not particularly difficult to work with, but I know some quilters shy away from them. I'd love to know if there are any particular questions I should address, or tips I could share.
If you don't want to miss the tutorial when I post it, watch this blog, sign up for my newsletter or follow me on Instagram or Facebook.
Happy quilting,
Joanne
The Rush pattern is available as a PDF download in my shop. You can ask for a print version at your favourite quilt shop. Shops, please visit my website for wholesale info or order from Checker Distributor.


I love it and what a brilliant brain wave with doing it as chevrons. I am also in awe of that wonderful custom quilting done on your domestic machine. As for thread colour matching, I always pull the single thread to see how it works, so understand with that red. Thanks for sharing, take care & hugs.
ReplyDeleteThis design is so striking in those colors, and I think it was smart to not do it with flying geese. I have made a pattern years ago that called for those types of angle cuts. It wasn't hard once I got the hang of it. But I haven't done it since, so I would need a refresher.
ReplyDeleteI've had that same type of experience with thread color. Someone told me once that if you can't pull of a thread to see if it works (like you are in a store trying to match thread), choose one shade darker than you think you need.
Those colors are so beautiful and I love the dark background! Another winner!
ReplyDeleteAnother fabulous design and the quilting on it really makes it.
ReplyDeleteCool pattern. I like the 3D effect with the colors. Chevrons was a good choice. And yay for getting it quilted!
ReplyDeleteIt's a beautiful quilt....... Friend made one using the same technic last week..... I'm keen to give one a go......
ReplyDeleteI never know how to quilt a top, so they end up in the laundry basket of quilt tops patiently waiting their turn. LOL
ReplyDelete