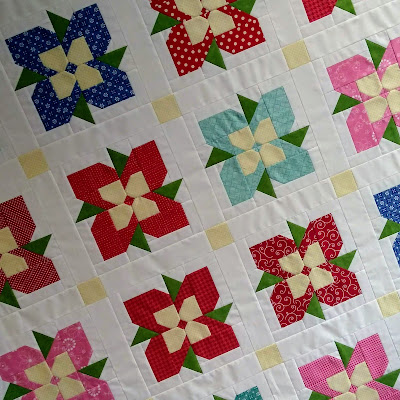
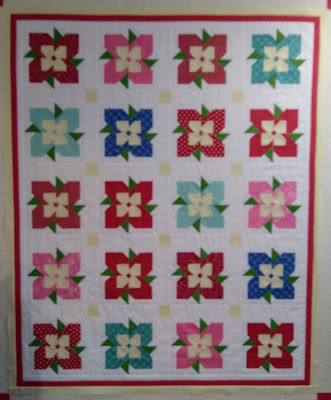
Today may be the official first day of fall, but summer is in full bloom in my sewing room. I tweaked the bloom block I shared in my previous post. I just reshaped and shrank the leaves a little to make them a little bit less prominent.
Once the block was just the way I wanted it, I dithered about cutting into the fabrics I bought. I knew I wanted to use all the reds, but I was pretty sure I didn't want only reds. I was also pretty sure I could use the pinks as well, but I wasn't sure about the blue, or the aquas. I didn't want to waste fabric by making the blocks then not using them. Really, that little internal discussion wasted way too much time!
In the end I convinced myself that I could just make a secondary project with any blocks that didn't make the final cut for the quilt. I cut pieces for one block from each fabric, made those 10 blocks, and what do you know, I liked the combination just fine! I cut another set to make another 10 blocks and headed back to the sewing machine...and the pressing board...and the cutting mat.
 |
I designed the block using stitch-and-flip/lost corners/folded corners (pick your label!) instead of cutting triangles and dealing with bias edges and at least one non-standard shape. It makes assembly easier, but it does involve a lot of trimming. At least they are pretty trimmings.
Sashing and cornerstones came next. I chose the same yellow as I used for the small petals to avoid introducing yet another fabric to make things busier. I definitely wanted cornerstones. Cornerstones help me line up blocks nicely, and they help me avoid measuring long strips for the horizontal sashing.
That's a terrible photo. That's what happens when I take photos in my sewing room at night. Nevertheless, you get an idea of how the blocks play together.
Since I like to avoid measuring and sewing long strips, you would think I would avoid multiple borders. I really dislike measuring and pinning borders. I stress about it and I dither and even when I do get to work on them I'm slow as molasses. It took me all afternoon to add the background border (I guess you could call that the outside sashing) and two more narrow borders.
If I dislike adding borders so much, why do I design quilts with borders? I do it because borders can help pull everything together and transform the quilt from OK to one that makes me do a happy dance. Not every quilt needs them, but this one certainly does. Just to be clear, those narrow borders are not transforming the quilt all on their own. They look rather uninspiring right now, but just wait until you see them paired with the final pieced border. There are white dots on red involved, and a little bit of yellow gingham-like print. I'm working on that last border now, and I'm getting ready for the happy dance!
Happy quilting!
Joanne
UPDATE: The Prairie Mix quilt pattern is now available here.


Really cute! I wish I had added cornerstones on my latest - the long sashing killed me. And borders! It's amazing how some quilts so desperately need them and others don't.
ReplyDeleteI like all the colors together, too, but completely understand that internal conversation and second-guessing. Lately I've just made an effort to ignore it and plow ahead. Seems to be working so far, but I may be pressing my luck, too! I'm curious about the border now, but I've known your quilting long enough to know it will be amazing. The whole quilt looks so springy, though, it's making me a tiny bit sad it is fall!
ReplyDeleteI love this one! Those flowers are adorable!
ReplyDeleteYou did a great job getting that one all figured out. It is really very pretty with all those colors. What will you be naming it? Why not "My Happy Dance"?
ReplyDeleteI really like this flower block. It makes me think of forget-me-nots. The soft cornerstones are a nice touch. I don't like doing long borders either, and I can postpone them for a LONG time. LOL Looking forward to seeing the final border.
ReplyDeleteJoanne, that is a sweet block, and the colours work very well. I get your feelings about borders. They don't usually inspire me, but I usually have at least one somewhere
ReplyDeleteKeep on doing the happy dance, this is beautiful!
ReplyDeleteThe colors look great together, happy for you that you could use them all!
ReplyDeleteAre you going to put this pattern in your Pattern Shop?
ReplyDeleteYes, the pattern will be in my shop once I finish writing it and it is properly tested. If you sign up for my newsletter (sign up is in the sidebar or in the footer of this blog), you'll be sure to get the pattern release announcement.
DeleteI really love this block and the way the quilt looks so far. I look forward to seeing the borders.
ReplyDeleteI loved these blocks when I first saw your trial blocks - and I love them even more in the quilt together. Looking forward to the final reveal!
ReplyDeleteThe flower shapes are just right! And the colors play together so nicely. Can't wait to see the final borders on this happy piece!
ReplyDeleteYour adjustments were just the ticket and your blooming quilt is so lovely. It’s going to be a desirable pattern for your store. Dots and gingham are a winner too!
ReplyDeleteLooking great.... and happy to hear that I am not the only one who thinks and works that way with borders!
ReplyDeleteYour newsletter looks great, and has a lot of helpful information. Thanks for sending it to me. I love that pieced border. It really sets off those pretty flower blocks. ---"Love"
ReplyDeleteWhat a beautiful quilt!
ReplyDeleteThe blossom blocks are so pretty! I love how you matched the cornerstones to the centers.
ReplyDeleteYour quilt is beautiful. Thank you for sharing. I just subscribed to your Newsletter. Looking forward to receiving it.
ReplyDelete